In this post, we’ll walk through creating a beginner-friendly LLM chatbot using LangGraph, Google Gemini, and Streamlit. We’ll also see how to easily trace our graph’s execution using LangSmith.
What is LangGraph?
LangGraph is a library for building stateful, multi-actor applications with LLMs. Unlike simple linear chains, LangGraph allows you to create cyclic graphs, making it perfect for complex workflows where you need loops, conditional branching, and persistent state.
Key Concepts for Beginners:
- State: A shared object that flows through your graph. It stores the chat history and any other data you need.
- Nodes: Individual functions that perform specific tasks (like calling an LLM or processing data).
- Edges: The paths between nodes.
- Conditional Edges: Decision-making paths that route the flow based on the current state (e.g., if the user asks for a joke, go to the “Joke Node”).
The Technical Implementation
1. Defining the State
We start by defining what our “State” looks like. In a chat app, the state is primarily the list of messages.
from typing import Annotated
from typing_extensions import TypedDict
from langgraph.graph.message import add_messages

class State(TypedDict):
    # 'add_messages' ensures new messages are appended to the list
    messages: Annotated[list, add_messages]
2. Creating the Nodes
Nodes are just Python functions. We created two nodes for this app:
chatbot_node: A standard node that sends the chat history to the LLM.joke_node: A specialized node that forces the LLM to tell a joke.
def chatbot_node(state: State):
    llm = ChatGoogleGenerativeAI(model="gemini-1.5-flash")
    response = llm.invoke(state["messages"])
    return {"messages": [response]}

def joke_node(state: State):
    llm = ChatGoogleGenerativeAI(model="gemini-1.5-flash")
    joke_prompt = [HumanMessage(content=f"Tell a short, funny joke about this topic: {state['messages'][-1].content}")]
    response = llm.invoke(joke_prompt)
    return {"messages": [response]}
3. The Router (Conditional Logic)
This is where the magic happens. The router looks at the user’s last message and decides which node to visit.
def router(state: State):
    user_input = state["messages"][-1].content.lower()
    if "joke" in user_input:
        return "joke"
    return "chat"
4. Building the Graph
We assemble the nodes and edges into a StateGraph.
workflow = StateGraph(State)

# Add Nodes
workflow.add_node("chatbot", chatbot_node)
workflow.add_node("joke_specialist", joke_node)

# Add Conditional Edges
workflow.add_conditional_edges(
    START,
    router,
    {
        "joke": "joke_specialist",
        "chat": "chatbot"
    }
)

# Both paths lead to the finish line
workflow.add_edge("chatbot", END)
workflow.add_edge("joke_specialist", END)

app = workflow.compile()
Streamlit UI Integration
Streamlit makes it incredibly easy to create a chat interface. We use st.chat_message and st.chat_input to handle the UI, and then invoke our LangGraph app whenever the user sends a message.
if prompt := st.chat_input("What is on your mind?"):
    # ... UI code ...
    result = app.invoke({"messages": [HumanMessage(content=prompt)]})
    final_response = result["messages"][-1].content
    st.markdown(final_response)
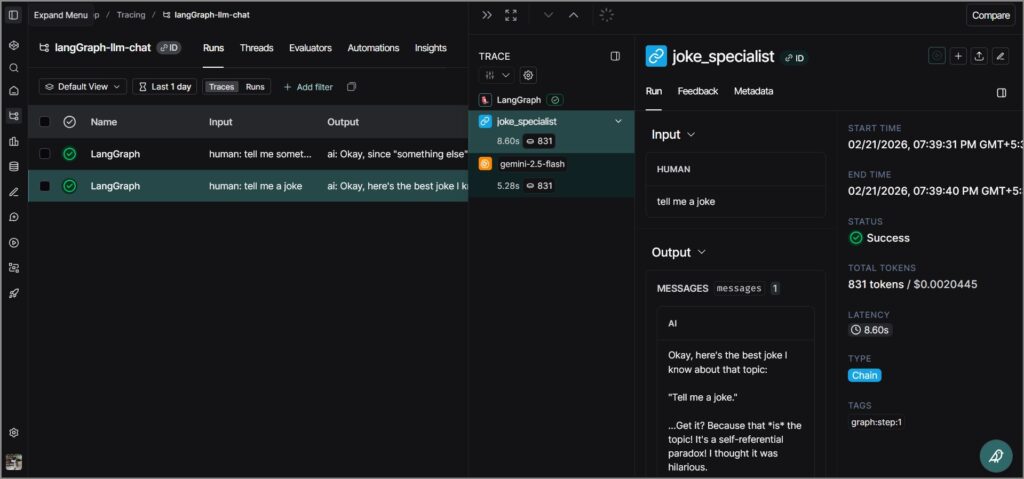
Adding Observability with LangSmith
Tracing what happens inside a complex graph can be hard. That’s where LangSmith comes in. By simply adding a few environment variables, every node execution, LLM call, and state transition is automatically logged.
Environment Variables used:
LANGSMITH_TRACING=trueLANGSMITH_API_KEY=your_keyLANGSMITH_PROJECT="<project-name>"
This allows you to see exactly how the router made its decision and debug any issues in the node logic.
Conclusion
LangGraph brings structure and power to LLM applications. By breaking down logic into nodes and using conditional routing, you can build sophisticated agents that are still easy to understand and maintain.
Github – https://github.com/sethlahaul/langGraph-llm-chat
Happy coding! 🚀