Lo-fi music has surged in popularity over the past few years, becoming a staple for study sessions, relaxation, and background ambiance. Characterized by its warm, nostalgic sound featuring reverb effects, slower tempos, and often vinyl crackle, lo-fi creates an atmosphere that many find perfect for focus and calm.
In this article, we’ll explore how to build a YouTube-to-Lo-Fi converter application using Python and Streamlit. This application allows users to transform any YouTube video’s audio into a lo-fi track by applying reverb and slowdown effects. We’ll dive into the technical implementation, explore the audio processing techniques, and discuss the challenges faced during development.
What is Lo-Fi Music?
Lo-fi (low-fidelity) music embraces imperfections in recording and production, creating a warm, nostalgic sound. Key characteristics include:
- Reverb effects: Creating a sense of space and atmosphere
- Slowed-down tempo: Often 5-30% slower than the original
- Vinyl crackle and noise: Adding texture and warmth
- Filtered frequencies: Typically reduce high frequencies for a warmer sound
Our application focuses on implementing the first two characteristics: reverb and slowdown effects.
Technical Architecture
The YouTube to Lo-Fi converter is built using several key technologies:
- Streamlit: For creating the web interface
- PyTubeFix: For downloading YouTube audio
- FFmpeg: For audio processing and format conversion
- Librosa: For advanced audio analysis and processing
- PyDub: For audio manipulation
- Matplotlib: For waveform visualization
The application follows a straightforward workflow:
- User inputs a YouTube URL
- Application downloads the audio using PyTubeFix
- Audio processing applies reverb and optional slowdown effects
- The user can preview and download the processed audio
Implementation Details
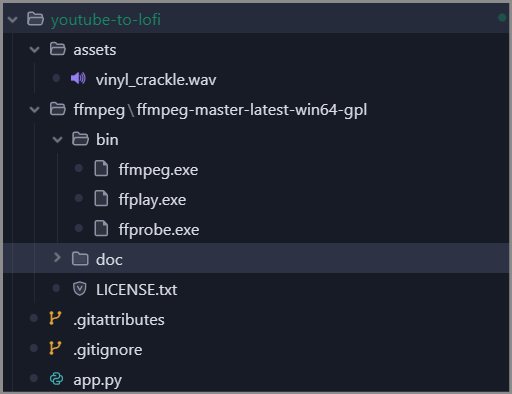
Setting Up FFmpeg
One of the core components of our application is FFmpeg, a powerful multimedia framework for handling audio and video. We need to properly configure it before using any audio processing libraries:
# Set ffmpeg paths - using normpath to ensure correct path format
ffmpeg_dir = os.path.normpath(os.path.join(os.path.dirname(os.path.abspath(__file__)),
                              "ffmpeg", "ffmpeg-master-latest-win64-gpl", "bin"))
ffmpeg_path = os.path.normpath(os.path.join(ffmpeg_dir, "ffmpeg.exe"))
ffprobe_path = os.path.normpath(os.path.join(ffmpeg_dir, "ffprobe.exe"))

# Add ffmpeg directory to system PATH first
os.environ['PATH'] = ffmpeg_dir + os.pathsep + os.environ['PATH']

# Set environment variables for all audio libraries
os.environ['FFMPEG_BINARY'] = ffmpeg_path
os.environ['FFPROBE_BINARY'] = ffprobe_path
os.environ['LIBROSA_FFMPEG_EXECUTABLE'] = ffmpeg_path
This setup ensures that all our audio libraries (PyDub, Librosa, etc.) use the same FFmpeg binaries, preventing compatibility issues.
Downloading YouTube Audio
The first step in our process is downloading audio from YouTube. We use PyTubeFix, a fork of PyTube that addresses some of the issues with YouTube’s constantly changing API:
def download_youtube_audio(url, output_path):
    """Download audio from YouTube video with enhanced error handling and retry mechanism"""
    max_retries = 3
    retry_count = 0

    # Clean and validate the URL
    url = url.strip()

    # Handle various YouTube URL formats
    if 'youtu.be' in url:
        video_id = url.split('/')[-1].split('?')[0]
        url = f"https://www.youtube.com/watch?v={video_id}"
    # ... other URL format handling ...

    while retry_count < max_retries:
        try:
            # Create YouTube object
            yt = YouTube(url, use_oauth=False, allow_oauth_cache=True)

            # Get available streams and select the best audio
            audio_streams = yt.streams.filter(only_audio=True)
            audio_streams_by_abr = audio_streams.order_by('abr').desc()
            video = audio_streams_by_abr.first()

            # Download the file
            out_file = video.download(output_path=output_path)

            # Convert to MP3
            base, ext = os.path.splitext(out_file)
            mp3_file = base + '.mp3'
            os.rename(out_file, mp3_file)

            return mp3_file, yt.title

        except Exception as e:
            # Error handling and retry logic
            retry_count += 1
            # ... retry logic ...
The function includes robust error handling with a retry mechanism, handling different YouTube URL formats, and selecting the highest quality audio stream available.
Applying Lo-Fi Effects
The heart of our application is the audio processing that transforms regular audio into lo-fi. We implement two main effects:
1. Slowdown Effect
The slowdown effect reduces the playback speed without changing the pitch, creating that characteristic lo-fi vibe:
# Calculate slowdown factor (0.5 to 1.0, where 0.5 is half speed)
slowdown_factor = 1.0 - (effects['slowdown_amount'] / 200.0)

# Use ffmpeg's atempo filter for slowdown
cmd = [
    ffmpeg_path,
    '-y',  # Overwrite output files
    '-i', temp_slowdown_path,
    '-filter:a', f"atempo={slowdown_factor}",  # Slowdown effect
    output_slowdown_temp
]

# Run the command
subprocess.run(cmd, check=True, stdout=subprocess.PIPE, stderr=subprocess.PIPE)
We use FFmpeg’s atempo filter, which allows us to adjust the tempo without affecting the pitch. The slowdown factor ranges from 0.5 (half speed) to 1.0 (original speed).
2. Reverb Effect
The application offers two reverb implementation options:
Fast Reverb (using FFmpeg’s aecho filter):
# Fast reverb implementation using direct ffmpeg
reverb_amount = effects['reverb_amount']
reverberance = min(100, reverb_amount * 10)  # Scale to 0-100

# Use ffmpeg's aecho filter for a quick reverb effect
cmd = [
    ffmpeg_path,
    '-y',
    '-i', temp_path,
    '-af', f"aecho=0.8:0.9:{reverb_amount * 50}:0.5",  # Simple echo effect
    output_temp
]
High-Quality Reverb (using convolution):
# High-quality reverb using librosa
y, sr = librosa.load(temp_path, sr=None)

# Create impulse response for reverb
reverb_length = int(sr * effects['reverb_amount'] / 20)
impulse_response = np.exp(-np.arange(reverb_length) / (sr * 0.5))

# Process in chunks to reduce memory usage
chunk_size = 2**18  # Process ~0.25M samples at a time
y_reverb = np.zeros_like(y)

# Process audio in chunks
for i in range(0, len(y), chunk_size):
    end = min(i + chunk_size, len(y))
    chunk = y[i:end]
    # Apply convolution to chunk
    chunk_reverb = np.convolve(chunk, impulse_response, mode='full')[:len(chunk)]
    y_reverb[i:end] = chunk_reverb
The high-quality reverb uses convolution with an exponentially decaying impulse response, which creates a more natural reverb sound. To manage memory usage, we process the audio in chunks.
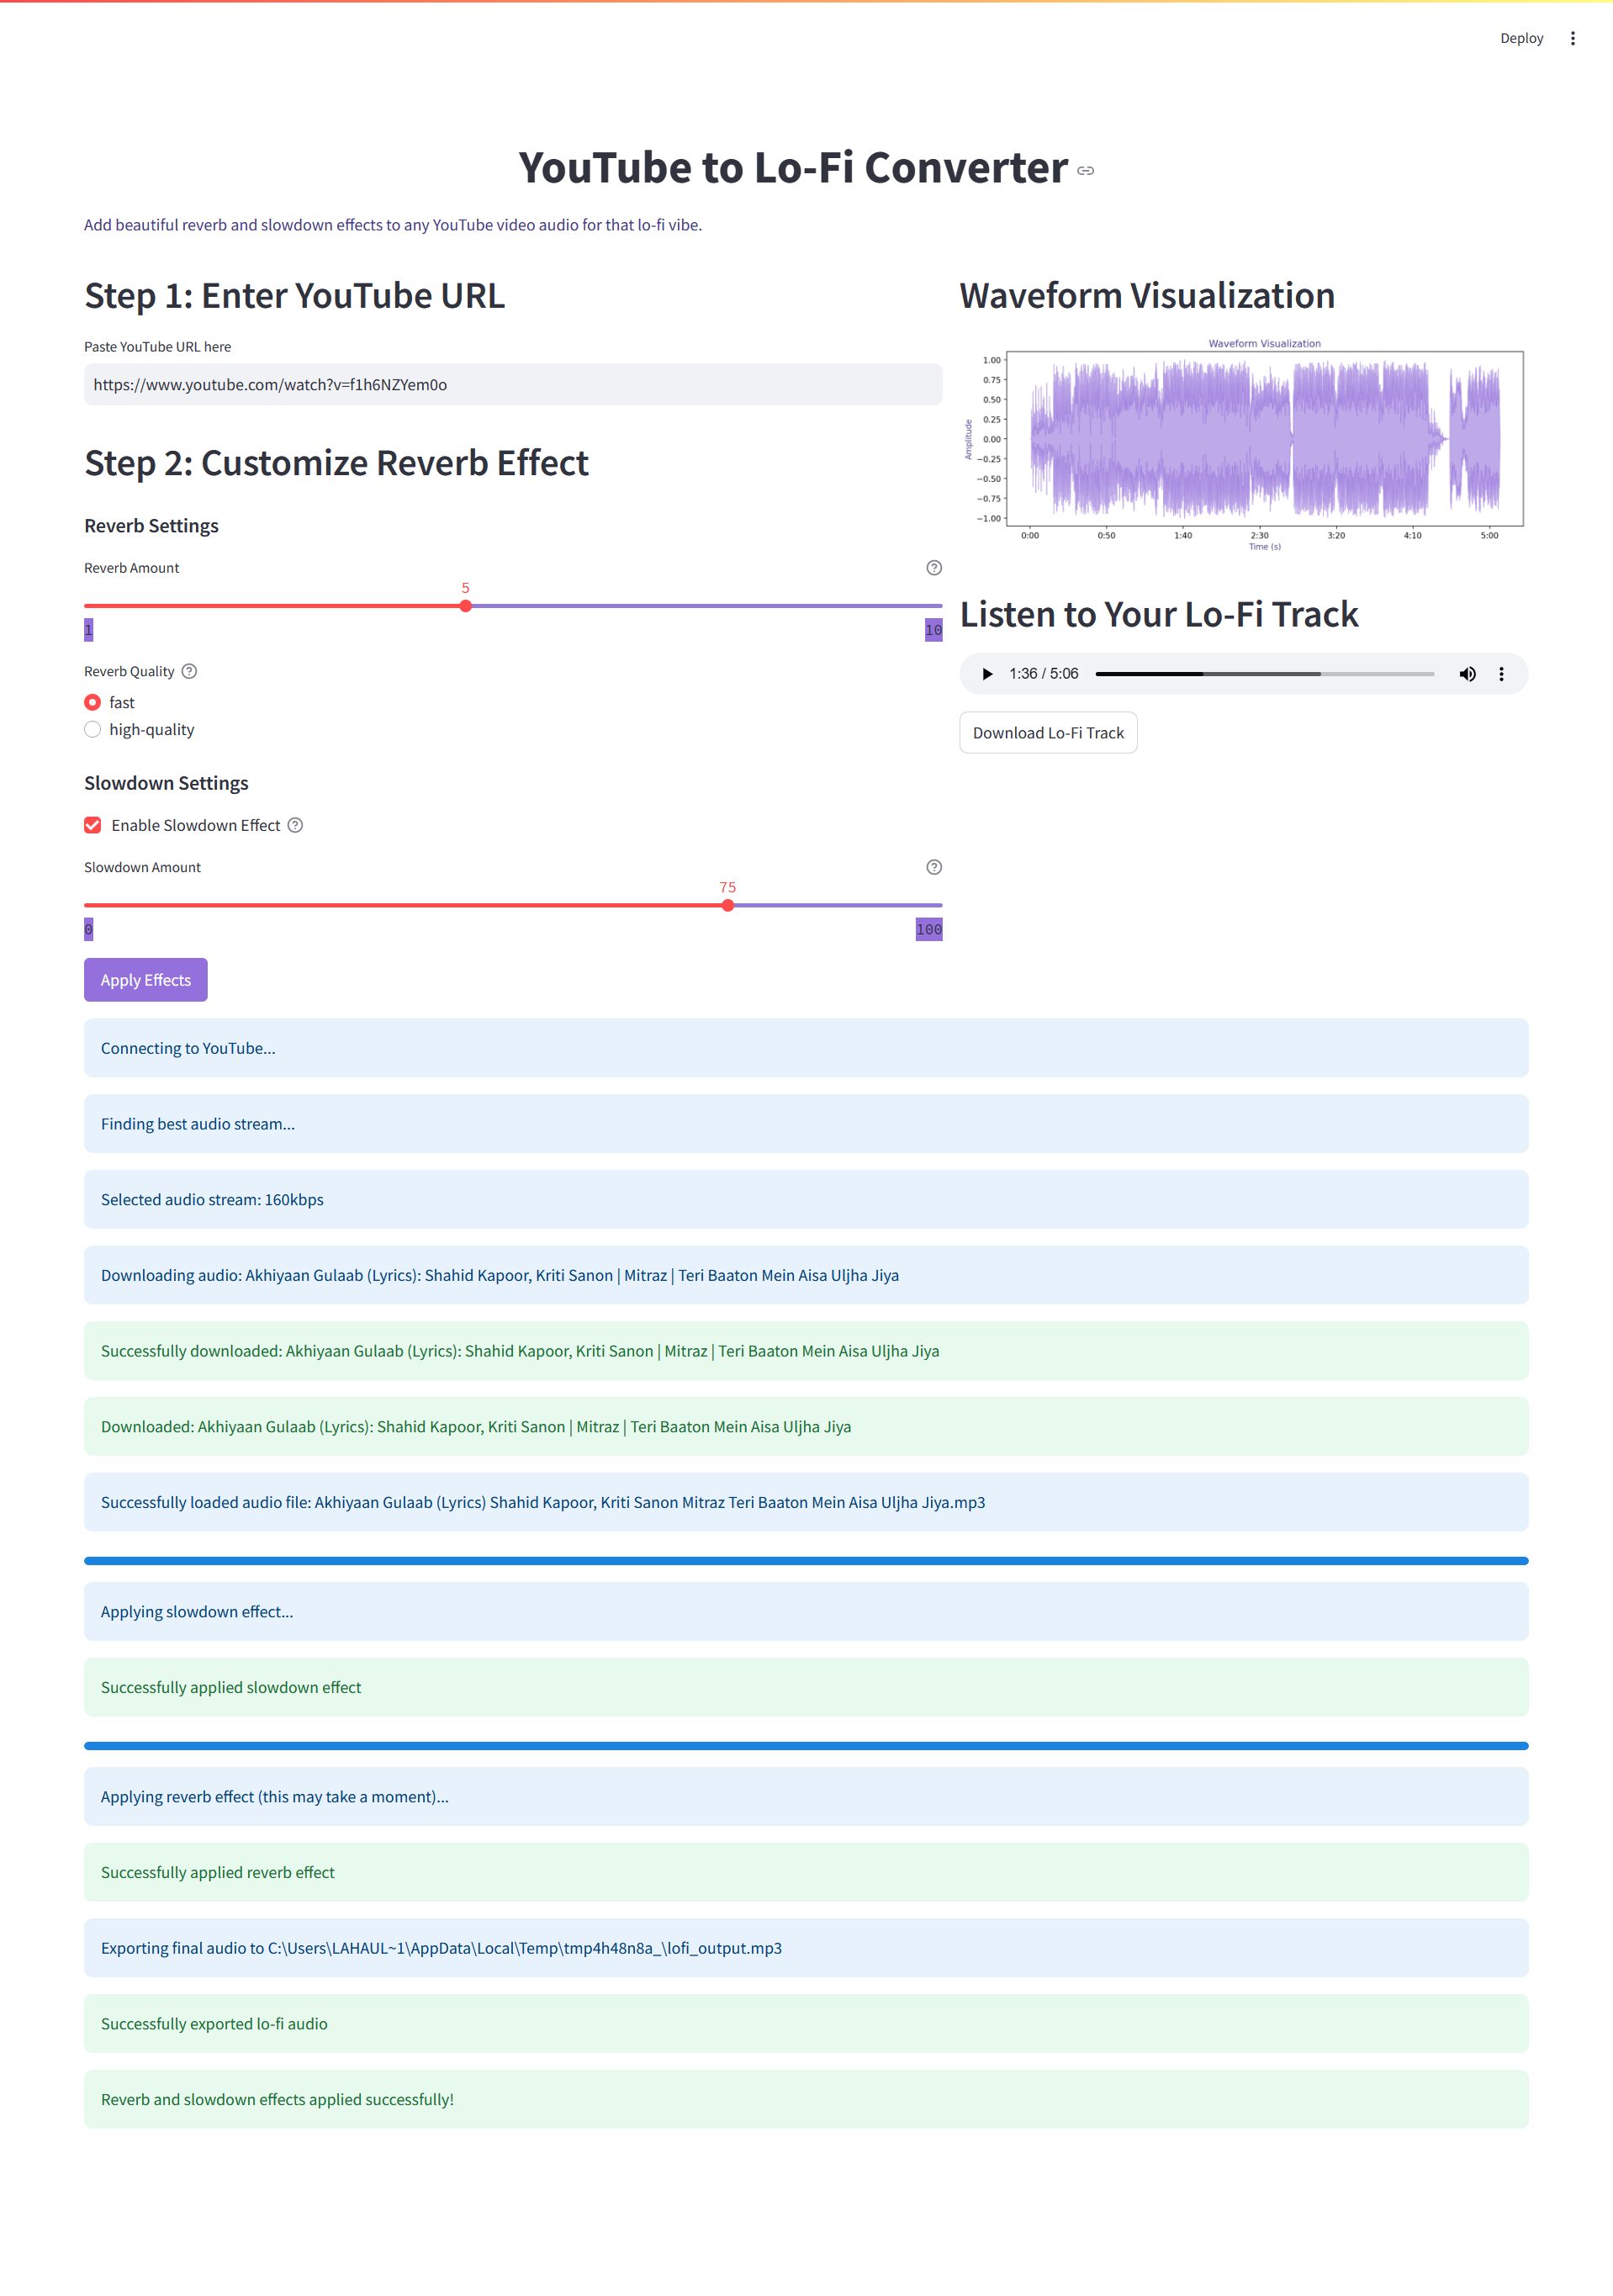
User Interface with Streamlit
Streamlit provides a simple yet powerful way to create web interfaces for Python applications. Our UI is designed to be intuitive and visually appealing:
def main():
    # App title and description
    st.markdown("<h1 class='main-header'>YouTube to Lo-Fi Converter</h1>", unsafe_allow_html=True)

    # Create two columns for the main layout
    col1, col2 = st.columns([3, 2])

    with col1:
        # YouTube URL input
        st.markdown("<h2 class='sub-header'>Step 1: Enter YouTube URL</h2>", unsafe_allow_html=True)
        youtube_url = st.text_input("Paste YouTube URL here")

        # Reverb effect options
        st.markdown("<h2 class='sub-header'>Step 2: Customize Reverb Effect</h2>", unsafe_allow_html=True)
        reverb_amount = st.slider("Reverb Amount", 1, 10, 5)
        reverb_quality = st.radio("Reverb Quality", ["fast", "high-quality"], index=0)

        # Slowdown controls
        slowdown_enabled = st.checkbox("Enable Slowdown Effect", value=False)
        slowdown_amount = st.slider("Slowdown Amount", 0, 100, 30)

        # Process button
        process_button = st.button("Apply Effects")
The interface includes sliders for adjusting effect parameters, allowing users to customize the lo-fi sound to their preference.
Waveform Visualization
To provide visual feedback, we generate a waveform visualization of the processed audio:
def create_waveform_plot(audio_path):
    """Create a waveform visualization of the audio"""
    # Load the audio file
    y, sr = librosa.load(audio_path, sr=None)

    # Create the figure and axes
    plt.figure(figsize=(10, 4))

    # Plot the waveform
    librosa.display.waveshow(y, sr=sr, alpha=0.6, color='#9370DB')

    # Customize the plot
    plt.title('Waveform Visualization', color='#483D8B')
    plt.xlabel('Time (s)', color='#483D8B')
    plt.ylabel('Amplitude', color='#483D8B')
    plt.tight_layout()

    return plt.gcf()
This visualization helps users see the audio’s amplitude patterns and provides a more engaging experience.
Challenges and Solutions
Challenge 1: YouTube API Changes
YouTube frequently changes its API and page structure, which can break libraries like PyTube. To address this, we:
- Used PyTubeFix, a more actively maintained fork of PyTube
- Implemented a robust retry mechanism with exponential backoff
- Added fallback methods for different extraction approaches
Challenge 2: Memory Management for Audio Processing
Audio processing, especially reverb using convolution, can be memory-intensive. Our solution:
- Processed audio in chunks to reduce memory usage
- Offered a “fast” reverb option using FFmpeg’s filters for less resource-intensive processing
- Cleaned up temporary files immediately after use
Challenge 3: FFmpeg Integration
Ensuring consistent FFmpeg usage across different libraries was challenging. We solved this by:
- Bundling FFmpeg with the application
- Setting environment variables to ensure all libraries use the same FFmpeg binaries
- Adding robust error handling for FFmpeg operations
Future Enhancements
The YouTube to Lo-Fi converter could be enhanced in several ways:
- Additional Effects: Adding vinyl crackle, frequency filtering, and beat manipulation
- Batch Processing: Allowing users to process multiple YouTube videos at once
- Preset Profiles: Creating preset lo-fi styles (e.g., “Study Beats”, “Chill Vibes”)
- Audio Visualization: Adding more advanced visualizations like spectrograms
- Cloud Deployment: Hosting the application on a cloud platform for wider accessibility
Conclusion
Building a YouTube to Lo-Fi converter demonstrates the power of Python’s audio processing capabilities. By combining libraries like PyDub, Librosa, and FFmpeg with Streamlit’s intuitive interface, we’ve created an application that makes audio transformation accessible to everyone.
The project showcases several important concepts in audio processing:
- Digital signal processing techniques (convolution, filtering)
- Audio format conversion and manipulation
- Memory-efficient processing of large audio files
- Creating intuitive user interfaces for complex operations
Whether you’re a music producer looking to experiment with lo-fi sounds or a developer interested in audio processing, this project provides a solid foundation for understanding and implementing audio effects in Python.
Here’s how the Streamlit app looks.
Also, note that you will need the ffmpeg binaries on your local system to run this. These files are not included in Github as they are greater than 100MB in size. Binaries can be downloaded from here.
Note: The complete source code for this project is available on GitHub. Feel free to fork, contribute, or use it as a starting point for your own audio processing applications.